What is the best place to start when you want to learn to draw flowers? With a clear method that breaks the form down before adding detail. A well-structured flower drawing tutorial shows you not just how to draw one specific flower but how to approach any bloom by understanding its underlying geometry. That transferable process is more valuable than a set of steps for a single subject, because it gives you the tools to tackle a rose, a daisy, a tulip, or an iris with equal confidence.
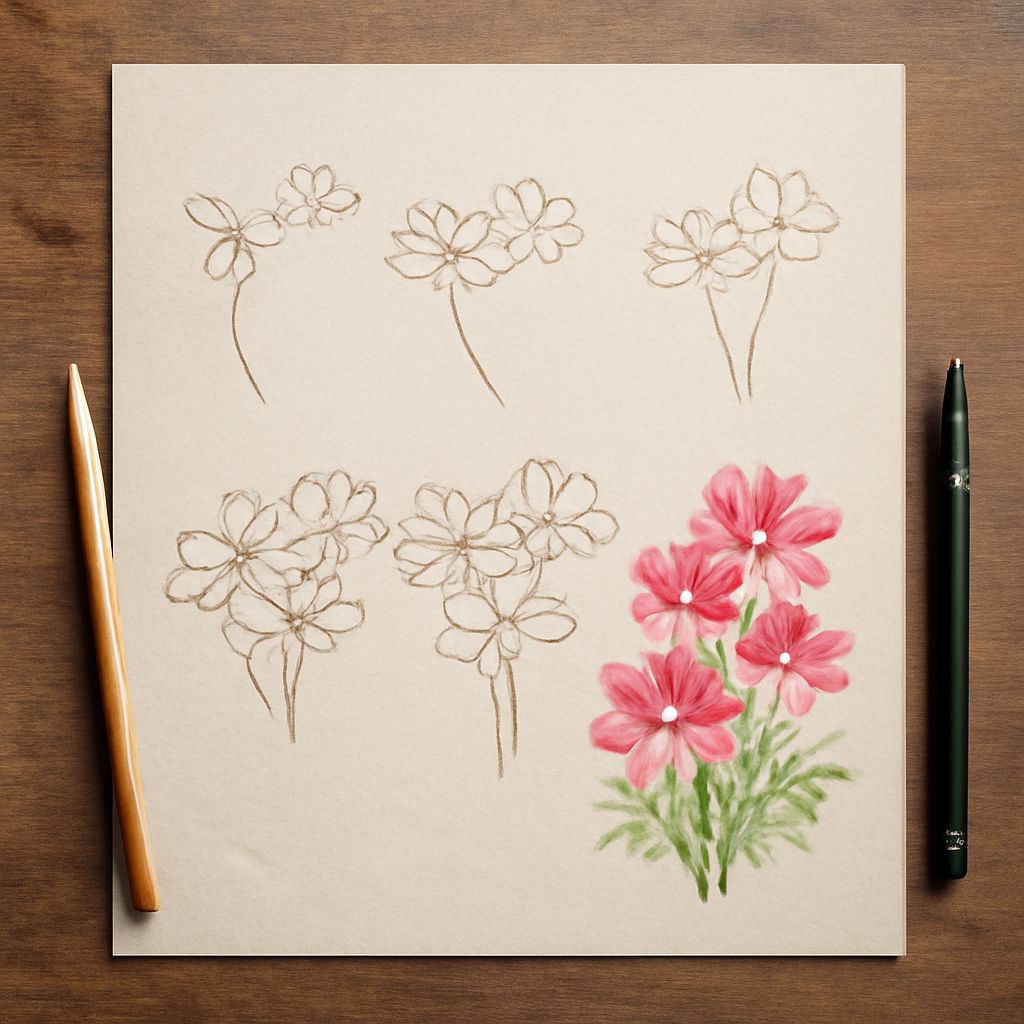
A basic flower drawing starts with observation and simple shapes. Drawing flowers step by step from a geometric foundation lets you place petals correctly relative to the center before any detail work begins. Step by step drawing flowers in this way also makes the process repeatable, which is how you build consistency over many practice sessions. Knowing how to sketch a flower from a structural starting point rather than from the outside edge inward produces drawings that feel grounded and coherent.
Before You Draw: Understanding Flower Structure
The Five Parts of a Flower Every flower drawing tutorial should start with structure. Most flowers share the same five basic parts: petals, sepals, stamens, pistil, and receptacle. Petals surround and protect the reproductive parts. Sepals are the leaf-like structures at the base of the flower that enclosed it when it was a bud. Stamens are the male reproductive structures, typically thin stalks topped with pollen-covered anthers. The pistil is the female reproductive structure in the center. The receptacle is where the flower attaches to the stem. Knowing these parts helps you decide which elements to include and how prominently.
Types of Petal Arrangements Flowers arrange their petals in different ways: single row (like a simple daisy), multiple overlapping rows (like a rose), or radially symmetric patterns with consistent spacing (like a sunflower). Understanding what type of arrangement your flower has before you start drawing flowers step by step prevents the most common structural errors. A rose that looks like a daisy is not a rose; it is a drawing that missed the layering.
Basic Flower Drawing: The Geometric Foundation
Starting with the Center Circle
Every basic flower drawing starts the same way: a circle for the flower’s center. This circle does not need to be perfect. Its size relative to the page sets the scale for every other element. Most beginners make this center circle too small, which crowds the petals and makes the finished flower look cramped. The center circle should occupy roughly 20 to 30 percent of the flower’s total diameter.
Placing Petals with Guide Lines Draw evenly spaced lines radiating from the center circle outward, like spokes on a wheel. These become guides for petal placement. Count your flower’s petals in your reference before you draw them; placing six petals when your flower has five will always look wrong. In step by step drawing flowers with a guide-line system, you place one petal along each spoke, then adjust spacing before committing to a final outline.
Shaping Individual Petals Draw each petal as a simple rounded oval first. Then refine the shape to match your specific flower. A tulip petal is teardrop-shaped with a pointed tip. A daisy petal is elongated and slightly tapered at both ends. A rose petal has an irregular, slightly ruffled edge. In a flower drawing tutorial context, you are teaching your hand to recognize these specific shapes through repetition rather than copying a single image.
Drawing Flowers Step by Step: Three Common Types
Simple Five-Petal Flower
Start with a small circle, then add five evenly spaced ovals around it. Connect them with a smooth outer edge. Add short stamen lines from the center. This basic flower drawing is the foundation for dozens of flower types, from cherry blossoms to wild roses to pansies. Mastering this basic form first gives you a template you can modify rather than starting from scratch for every new subject.
Daisy-Style Flower
The daisy arrangement uses a round center disk surrounded by a single row of elongated ray petals. The petals attach at the edge of the center circle and point straight outward. Unlike the basic five-petal form, daisy petals are narrower and more numerous, typically 15 to 25 on a real daisy. In step by step drawing flowers of the daisy type, draw the center disk first, then add petals in groups of five rather than one at a time, which helps maintain even spacing.
Rosebud and Layered Bloom A rosebud in three-quarter view shows how to sketch a flower with overlapping layers rather than petals radiating from a flat center. Start with the innermost tightly furled petals at the center, then add the outer petals wrapping around them. Each outer petal overlaps the one inside it slightly. This layered approach requires you to work from the inside outward rather than from the outside edge inward, which is the opposite of how many beginners approach roses.
How to Sketch a Flower: Adding Stems and Leaves
Drawing the Stem
A flower stem is never perfectly straight. It curves slightly and tapers toward the flower head. The thickness at the base is roughly twice the thickness at the top in most flowers. Draw the stem as two parallel curved lines that converge slightly toward the top, then close with a smooth curve at the base where the flower attaches. Adding a slight curve gives the stem a natural quality that straight-line stems cannot convey.
Leaf Shapes and Attachment
Leaves attach to the stem at nodes, not at random intervals. Each leaf has a midrib, secondary veins, and a specific edge character: smooth, toothed, or lobed. For a basic flower drawing, one or two leaves placed at node points along the stem complete the composition without overcomplicating it. A simple teardrop leaf shape with a midrib line reads clearly and adds botanical grounding to the drawing.
Refining Your Flower Drawing
Shading Petals for Depth
Petals are slightly translucent, which means shading is soft and gradual rather than dramatic. Shade the area nearest the center darker, where petals sit in shadow, and leave the outer edges lighter where they face the light source. This gradient, even when subtle, transforms a flat outline into a convincing three-dimensional form. In a flower drawing tutorial context, this shading step is where most beginners see the most dramatic improvement in their work.
Adding Texture and Detail
Fine pencil marks along the petal’s length suggest the slight ribbing that most petals have. These marks should follow the petal’s curve rather than crossing it at right angles. Center details, like the small bumps or dots on a poppy’s seed pod center, add botanical realism with minimal effort. Keep these details light enough that they read as texture rather than competing with the overall form.