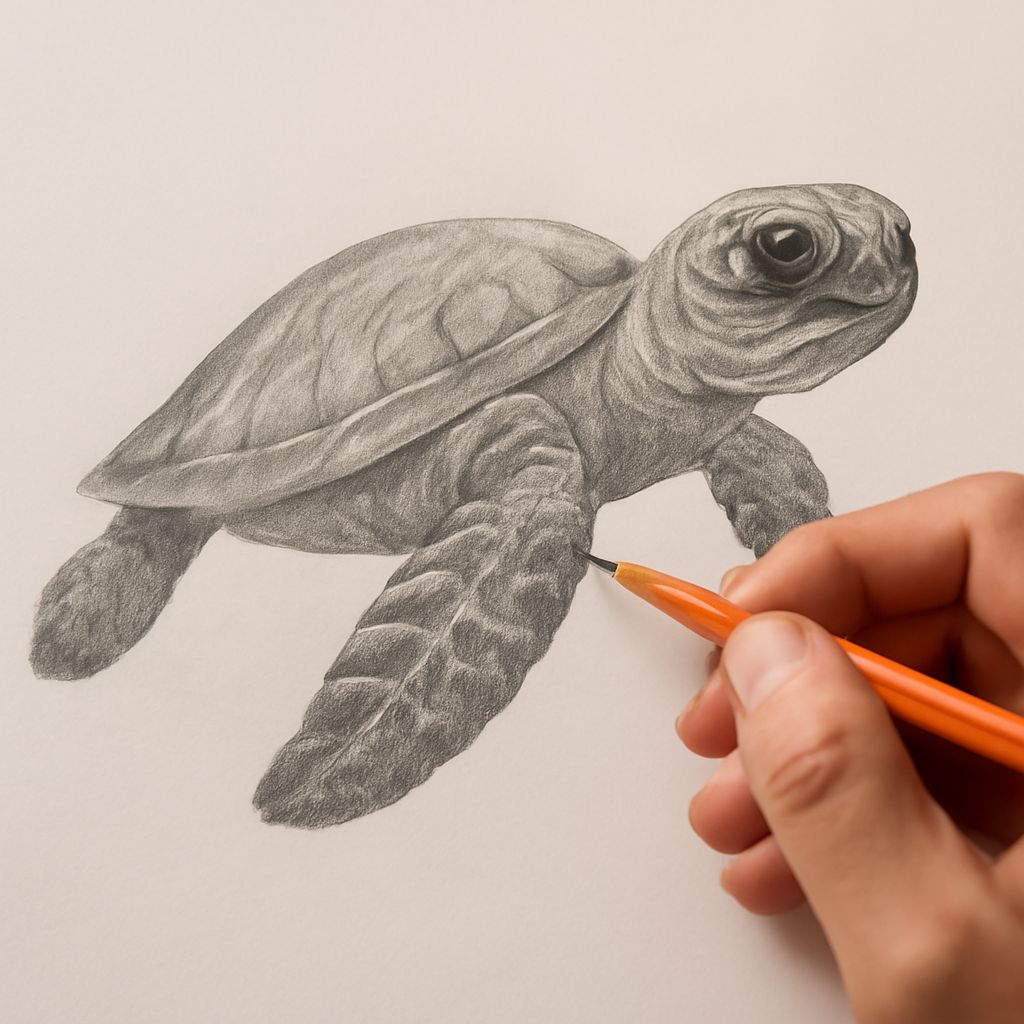
Drawing of a Snake: Techniques, Styles, and Step-by-Step Guidance
What makes a drawing of a snake so challenging — and so satisfying to get right? Snakes combine a deceptively simple silhouette with complex surface detail: scale patterns, skin sheen, coiled form, and a head structure that demands careful proportion work. Whether you’re working on a drawing snake study for a sketchbook, incorporating a queen of hearts drawing with a serpent motif, or attempting something as compositionally intricate as an ark of the covenant drawing with flanking serpents, the fundamentals of snake anatomy and form apply across all of them.
This article walks through the foundational techniques for drawing of snake subjects, covers multiple stylistic approaches from realistic to decorative, and gives you concrete practice steps for improving at each stage. A drawing snake study is one of the best exercises for learning how to draw tubular, sinuous forms that curve through space — a skill that transfers to ropes, vines, hair, tentacles, and dozens of other subjects.
Understanding Snake Anatomy Before You Draw
The Basic Body Structure
A snake’s body is essentially a flexible cylinder that tapers from the thickest point behind the head to the tail tip. The head is a distinct shape — roughly wedge or oval depending on species — that connects to the body through a narrower neck region. When you approach a drawing of a snake, start by mapping this cylinder in three-dimensional space before adding any surface detail. Artists who rush to scales and patterns without establishing the underlying form end up with flat, confusing images that don’t read as three-dimensional.
How Coils Work in Space
Coiled snake drawings are compositionally interesting precisely because they require you to show one continuous form overlapping itself multiple times. Each coil sits either in front of or behind adjacent coils, and getting that spatial logic right is what separates a convincing drawing snake composition from a flat tangle of lines. Use light construction lines to map the full path of the body before committing to final contours. Decide which coils sit on top at each intersection and shade accordingly.
Scale Patterns and Surface Texture
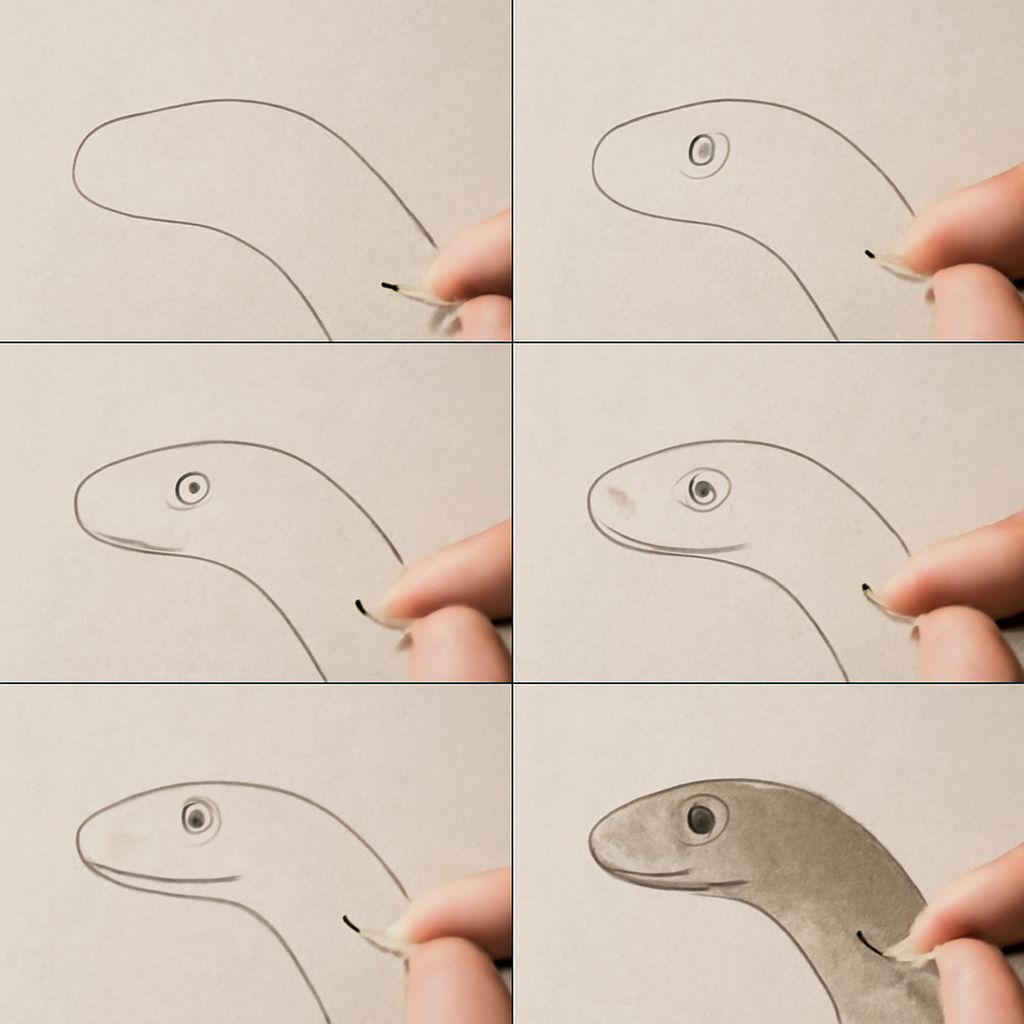
Scale detail is where many artists spend disproportionate time. The important thing to know: you don’t draw every scale individually except at very high detail levels. Instead, you draw the pattern of scales — the repeating rows — and let the viewer’s eye complete the texture. In a realistic drawing of a snake, scales closer to the viewer read with more detail while those wrapping around the far side of the form simplify into suggestion. This is how form and texture work together rather than competing.
Stylistic Approaches: Realistic to Decorative
Realistic Snake Studies
Realistic snake drawing prioritizes accurate anatomy, correct scale pattern for the species, and convincing three-dimensional form. Reference photographs are essential — different snake species have dramatically different head shapes, scale arrangements, and body proportions. A ball python looks nothing like a king cobra at the head level. Working from good reference rather than generic “snake” imagery produces results that feel grounded and credible.
Decorative and Folk Art Styles
Decorative snake drawing appears across dozens of traditions — from Art Nouveau sinuous forms to geometric indigenous patterns to the stylized serpents in heraldry and medieval manuscript illumination. In these contexts, anatomical accuracy matters less than visual rhythm and ornamental function. A decorative drawing snake study might flatten the form completely, use stylized scale patterns that repeat geometrically, and arrange the coils in a symmetrical, medallion-like composition.
Incorporating Snakes into Complex Compositions
The queen of hearts drawing tradition — playing card art — features serpents as symbolic accessories and compositional elements. When you place a snake within a larger composition, the serpent form needs to integrate with the surrounding elements without overwhelming them. Study how historical illustrators and tattoo artists have solved this problem: they typically use the snake’s sinuous path to create visual flow through the composition, guiding the viewer’s eye from one focal point to another.
The ark of the covenant drawing presents a different compositional challenge: serpents as guardians or flanking elements around a central sacred object. In this context, the snake forms need to feel powerful and symmetrical, often posed in mirrored arrangements that reinforce the central composition’s authority. This is a very different challenge from a naturalistic coiled snake study, but it draws on the same understanding of snake form.
Step-by-Step Practice Structure
Session 1: Basic Coil Construction
Start every drawing of a snake practice session with the same warm-up: draw five different coil arrangements using only curved lines, no detail. Map the overlapping points and shade each intersection to establish which coil is on top. This exercise builds the spatial logic before you layer in any surface complexity.
Session 2: Head Studies
Dedicate full sessions to snake head drawing. Work from photographic reference of at least three different species. Focus on the eye placement, the mouth line, and the way the scales arrange around the jaw. Head proportion is where most snake drawings go wrong — the head is usually larger relative to the neck than artists initially estimate.
Session 3: Full Composition with Detail
Combine your coil construction skills and head studies into a full drawing snake composition. Block in the full body path first, resolve all spatial overlaps, add the head with correct proportions, then build surface texture from general to specific. Work the entire drawing to roughly the same level of finish before adding detail to any single area.
Materials and Tools
For traditional media, a set of graphite pencils ranging from 2H to 6B gives you the full value range needed for convincing scale texture and form shading. Smooth bristol paper handles fine detail better than textured watercolor paper for most snake studies. For ink work, a brush pen gives you the variable line weight that snake contour drawing benefits from enormously — thick on the shadow side, thin on the lit side.
Digital snake drawing works well in any program that supports brush opacity mapped to pen pressure. The ability to create separate layers for construction lines, contour, and texture speeds up the workflow significantly and lets you refine each stage independently.
Next steps: Choose one snake species and gather three to five high-quality reference photographs from different angles. Spend your first session doing nothing but coil construction studies, then move to head studies in your second session, and combine both into a full composition in your third. Repeat this three-session cycle with a different species or compositional context until snake form feels intuitive rather than effortful.