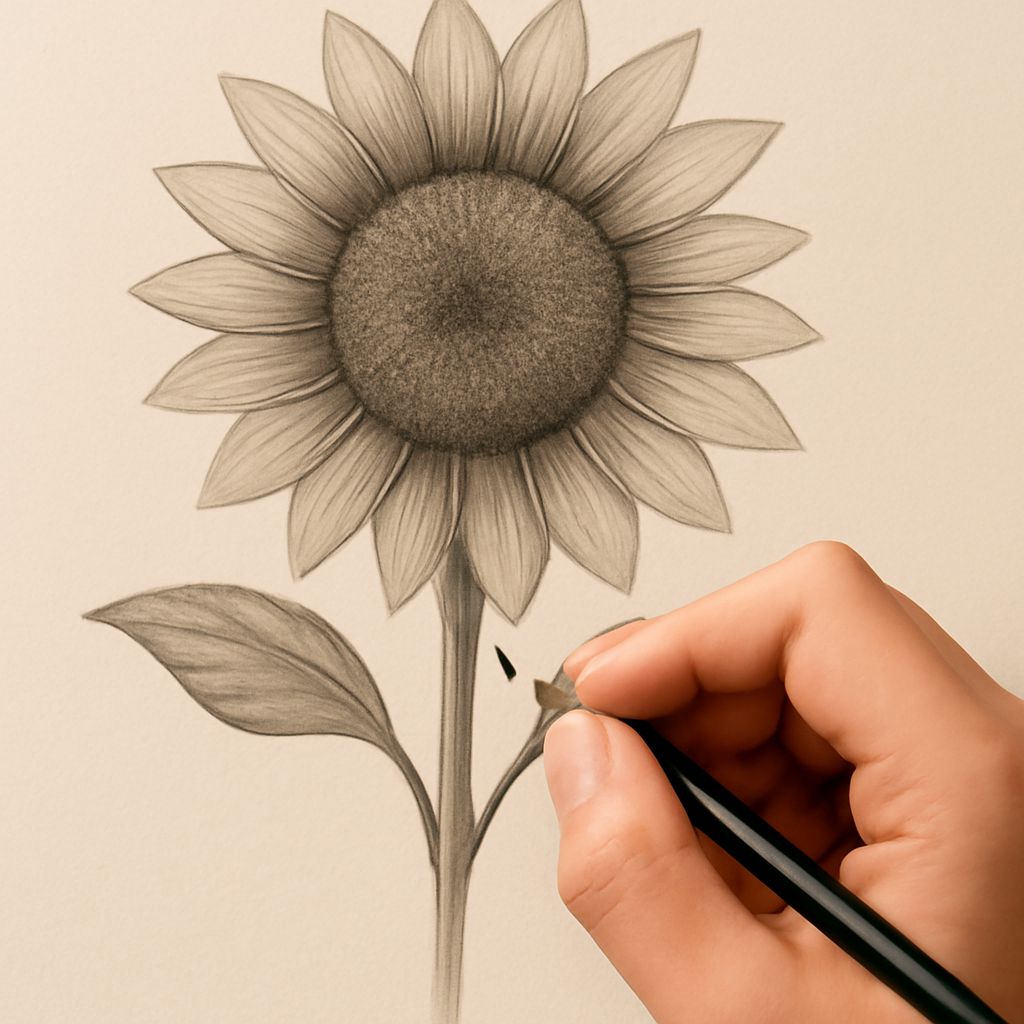
Drawing of a Sunflower: A Step-by-Step Guide for Beginners and Beyond
How do you turn a complex flower into a drawing you are actually proud of? The answer is structure. A drawing of a sunflower breaks down cleanly into a few geometric forms, and once you understand those forms, the process becomes manageable at any skill level. A simple sunflower drawing is achievable in under an hour, and the techniques you practice on it apply directly to more complex botanical subjects.
If you have tried sunflower drawing simple methods before and found the petals frustrating, you are not alone. The challenge is usually not petal shape itself but petal placement. A sunflower botanical illustration approach solves this by treating the flower as a structured diagram before any detail work begins. Drawing a sunflower from a botanical mindset means measuring, comparing, and placing before rendering.
Getting Started with a Simple Sunflower Drawing
Choosing Your Tools
For a simple sunflower drawing, you need very little: a pencil, an eraser, and paper. An HB pencil is a good all-purpose starting point. It is dark enough to see but light enough to erase without leaving deep grooves in the paper. If you want to add shading, a 2B or 4B pencil gives you access to darker values without pressing hard and damaging the paper surface.
Setting Up Your Reference
Even experienced artists use references. A real sunflower, if available, is the best option. A high-quality photograph works well too. Prop your reference somewhere you can glance at it easily without craning your neck. Before you make your first mark, spend a full minute just looking at the flower. Notice where the petals attach, how the center sits relative to the petals, and how much of the total image the stem and leaves occupy.
Breaking Down Sunflower Drawing Simple Steps
The Circle Framework
Start with two lightly drawn circles: a small inner circle for the very center of the disk and a larger outer circle defining the overall size of the seed head. These two circles together establish the proportional target for your petals. Everything else in a sunflower drawing simple approach flows from this framework.
Petal Placement
Draw light radius lines from the center outward at roughly equal intervals. These become guides for petal placement. Most sunflowers have between 13 and 21 petals, though the exact number varies. For your drawing of a sunflower, aim for around 16 petals in the first pass. Each petal attaches at the edge of the seed head circle and extends outward 1.5 to 2 times the radius of that circle.
Center Detailing
The sunflower center has a spiral pattern formed by florets in two directions simultaneously. Lightly sketch two sets of curved lines crossing the disk: one set curving clockwise and one counterclockwise. Where they intersect marks each floret position. You do not need to draw every individual floret; the crossing lines alone suggest the pattern clearly in a simple sunflower drawing.
Sunflower Botanical Illustration Techniques
Scientific Accuracy in Petal Count
True sunflower botanical illustration pays attention to details that casual drawings skip. Sunflower petals follow Fibonacci sequence numbers, which is why you so often see 13, 21, or 34 petals on a given specimen. Using a realistic petal count gives your botanical work an accuracy that trained eyes will notice immediately.
Leaf Venation Details
In botanical illustration, leaves are not just shapes; they have internal structure. Sunflower leaves have a prominent midrib and secondary veins that branch off at roughly 45-degree angles. Adding even a simplified version of this venation pattern instantly elevates a basic drawing of a sunflower into something that reads as a considered study rather than a quick sketch.
Stem Structure
Sunflower stems are thick, slightly hairy, and not perfectly straight. They have a slight curve, especially near the top where the weight of the flower head pulls the stem forward. Rendering the slight roughness of the stem surface, using short, irregular marks along the edges, adds authenticity to a sunflower botanical illustration in a way that smooth, clean lines cannot.
Drawing a Sunflower: Shading and Texture
Light Source Decisions
Before you add any shading to your drawing a sunflower project, decide where the light comes from. Upper left is the most conventional choice because it matches most people’s instinctive reading of a lit scene. Mark this mentally or with a very light arrow on your reference, then apply shading consistently to all surfaces that face away from that direction.
Shading the Petals
Sunflower petals are thin and slightly translucent, which means shading them is subtle rather than dramatic. The darkest values appear where a petal is behind another petal or where it meets the seed head. The lightest values are at the tip and on the upper surface facing the light. Soft hatching with your pencil held at a low angle creates a smooth gradient that suits the petal’s texture.
Texture in the Seed Head
The seed head gets much darker shading than the petals. Apply a medium tone across the whole disk, then darken the spaces between the floret rows. Leave the top surface of each floret slightly lighter to suggest its rounded shape. A few short, firm marks in the very darkest areas add the impression of texture without requiring you to render every individual seed.
Next Steps After Your First Drawing
Once your first drawing of a sunflower feels solid, challenge yourself by working in color pencils. Try building from light to dark with yellows and ochres on the petals before adding burnt sienna and brown in the shadows. For a bigger step, take your sunflower study into ink and watercolor, using ink lines to hold the structure while watercolor fills in the color and atmosphere. Drawing a sunflower repeatedly in different media builds the kind of visual knowledge that makes every subsequent botanical subject easier to approach.