Anatomy Art: A Guide to Male Anatomy Drawing and the Anatomy Study Art Practice
Why does anatomy art separate artists who can draw figures convincingly from those who consistently struggle with proportion and structure? The difference is rarely talent. It’s almost always knowledge. Understanding the underlying skeletal and muscular structure of the human body gives you a framework that makes surface observation accurate rather than approximate. Whether you’re approaching male anatomy drawing for the first time or returning to anatomy study art after years away from structured learning, this guide gives you a practical entry point.
You’ll cover the foundations of anatomy art, the specific challenges and landmarks of drawing male anatomy, how to build a systematic anatomy study art practice, and the most effective approaches to drawing male anatomy and male body anatomy drawing across a range of poses and difficulty levels.
Why Anatomy Art Matters for Figure Drawing
Structure Before Surface
Anatomy art is the practice of using anatomical knowledge as a foundation for artistic figure work. It does not require medical precision. It requires enough structural understanding to draw convincingly at the surface level. When you understand that the shoulder’s surface shape is determined by the deltoid muscle sitting over the humeral head and the clavicle, you can draw a shoulder convincingly from any angle, including angles for which you have no specific photographic reference.
This structural knowledge is what separates artists who can generate figures from imagination and those who depend entirely on direct reference. Both approaches have value, but anatomy art knowledge makes your reference-based work more accurate and your imaginative work more plausible.
The Most Common Errors in Figure Drawing
Most figure drawing errors trace back to the same root causes: misunderstanding how joints work, misplacing muscle groups, or applying surface detail without understanding the underlying form. Male anatomy drawing errors specifically tend to cluster around the shoulder-to-hip ratio, the placement of the pectoral muscles relative to the clavicle, and the shape of the lower leg and foot. These are the areas where anatomy study art pays the most immediate dividends.
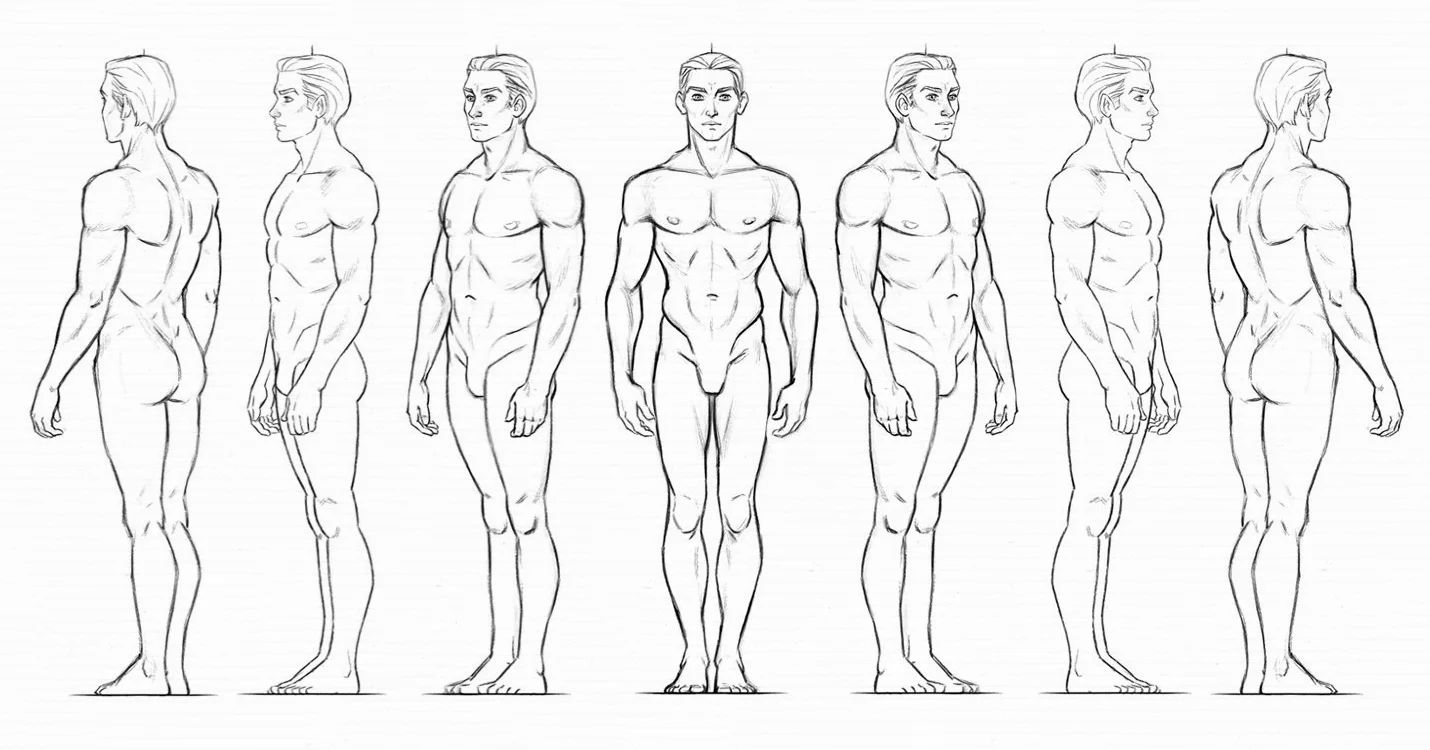
Key Landmarks for Drawing Male Anatomy
The Torso
Male anatomy drawing starts most effectively with the ribcage and pelvis as the two major volumes of the torso. The ribcage is roughly egg-shaped, wider at the bottom than the top in a front view. The pelvis is a bowl shape, wider at the iliac crests than at the pubic area. Understanding the three-dimensional relationship between these two masses, how they tilt and rotate independently in different poses, is the foundation of convincing male body anatomy drawing.
The muscles of the torso, the pectorals, the serratus anterior, the external obliques, the rectus abdominis, attach to and follow the shapes of these underlying masses. If your underlying mass placement is wrong, no amount of surface muscle detail will fix the drawing. Build the masses correctly first.
Limbs and Extremities
Arms and legs in male body anatomy drawing follow a consistent organic taper: they are widest at the joint areas and narrowest at the mid-shaft between joints. The muscles of the arm, biceps, triceps, brachioradialis, create bulges that shift position depending on the arm’s rotation. Anatomy study art for the upper limb should include drawings of the same arm position in multiple rotation states so you understand how the surface changes without the underlying skeleton changing.
Building Your Anatomy Study Art Practice
A structured anatomy study art practice combines three types of work: reference-based study from anatomy books or anatomical models, gesture drawing from live or photographic reference, and imaginative drawing that applies your anatomical knowledge without direct reference support. Each type builds a different aspect of your figure drawing ability.
For male anatomy drawing specifically, work through one anatomical region at a time rather than trying to learn the entire figure simultaneously. Spend two to three weeks exclusively on the shoulder and arm. Then move to the torso. Then the lower body. This focused approach builds genuinely solid knowledge rather than a superficial familiarity with everything that doesn’t serve you well when you need to draw a specific pose from imagination.
Next steps: Start with a quality anatomy reference book focused on artists rather than medical students. Draw the major skeletal landmarks of the male figure from memory, check against reference, and identify where your knowledge has gaps. Focus your next month of anatomy art work specifically on those gaps.